Back when we were expecting my nephew to be born I did a blog about some nurseries that I found that I liked. You can check that out here.
Now that we're expecting our own small fry soon my head is filled with ideas about what to fill our baby's first room with. While I've got some ideas that I'm for sure going to use I thought I'd share some photos of nurseries I've found that I really like. I LOVE the all white nursery, sadly hubster doesn't feel the same. (But to see photos of my all time favorite nursery be sure and check out Wren's nursery by Holly at Life in the Fun Lane.) Here are some all white rooms that I adore...
You'll have to forgive me in advance, but I will for sure be posting more nursery inspirations in the future. I'll also share some of the changes happening around Casa Weseloh as we arrange stuff for the big arrival.
Showing posts with label Home Inspiration. Show all posts
January 26, 2011
April 29, 2010
Sunroom
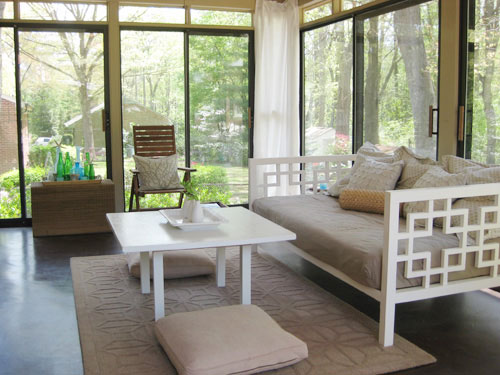
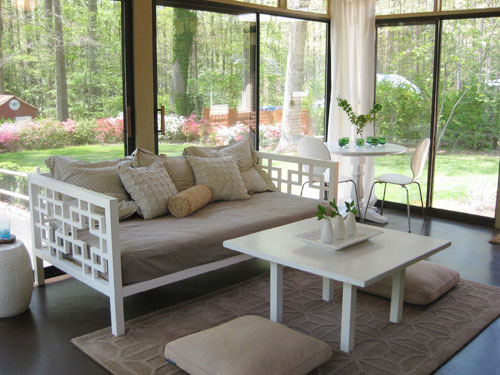
After composing my blog post about all the projects I've got on my mind about the house I came up with another one! Our sunroom. One of the things that I really loved about our house when we bought it was that it has a fully enclosed sunroom that connects to the family room. The deck is connected to it and it overlooks our yard. It is a nice room. Sadly the previous owners did nothing with it, and I have say that I am ashamed we've done very little with it as well. We did take down the sliding plastic shades from the windows and painted the walls, but there is still alot left to be desired.
The really big eyesore? Carpet. Ugh.
The sunroom is host to hunter green carpet. Not only is the room fully carpeted it has (and this is gross) big pee stains on it from the previous owners dogs. The dogs also damaged the carpet under the door. So yeah, it looks pretty good. Our plan has been to replace the flooring for a while now. I have been very tempted for the last several years to just rip up the carpet and paint the floor until we did something with it. My husband disagrees with this idea, strongly. So alas the carpet has stayed. I am hopeful that soon we will have new floors (probably a wood laminate or tile of some sort). So stay tuned for a room makeover soon (hopefully - hint, hint babe!)
I'm also considering hanging some soft long white curtain panels in the room. We'll see though.
In the meantime, while I'm dreaming of a new sun room, here is some eye candy to start you day dreaming of your own sun room (or of summer, or something equally as relaxng).
LOVE, L-O-V-E the Young House Love sunroom (and their whole house)
The really big eyesore? Carpet. Ugh.
The sunroom is host to hunter green carpet. Not only is the room fully carpeted it has (and this is gross) big pee stains on it from the previous owners dogs. The dogs also damaged the carpet under the door. So yeah, it looks pretty good. Our plan has been to replace the flooring for a while now. I have been very tempted for the last several years to just rip up the carpet and paint the floor until we did something with it. My husband disagrees with this idea, strongly. So alas the carpet has stayed. I am hopeful that soon we will have new floors (probably a wood laminate or tile of some sort). So stay tuned for a room makeover soon (hopefully - hint, hint babe!)
I'm also considering hanging some soft long white curtain panels in the room. We'll see though.
In the meantime, while I'm dreaming of a new sun room, here is some eye candy to start you day dreaming of your own sun room (or of summer, or something equally as relaxng).
LOVE, L-O-V-E the Young House Love sunroom (and their whole house)
The next set of photos are from Steve & Brooke Gianetti's home. Their house is GORGEOUS. They enclosed the back porch to make this sun room. To see more of their house and to see what Brooke is up to check out her blog.
After Brooke needed more space for a home office they decided to change the above side of the sun room, which was underused, into an office space (below). Doesn't it look like a relaxing place to work from home?
I really love the colors and texture in the room below by Lola B's.
I hope you're looking forward to a relaxing weekend!
March 3, 2010
Shabby Chic Eye Candy
To prove that I really don't love writing essays in my blog posts today I am going to share some picture love.
I tend to be kind of girly. Sometime a lot girly. I like pink (a lot) but I try to keep my decorating fairly gender neutral and middle of the road. If I lived by myself or had freedom to decorate a space to myself I suspect that I would decorate somewhat 'shabby chic'. I don't think I could ever do my house over the top in this style, but I love it in moderation (does that make sense to anyone else?). Even though I wouldn't consider my personal tastes to be overly floral or frilly, sometimes a girl needs a little of that! I think that what draws me personally to this style is how relaxed and inviting it seems. Wrinkles, cracked paint, patinas, and worn fabrics all seem so comforting!
I'm not sure on the source, but isn't it lovely to see the neutralness of this photo with the simple white dining chairs, chippy paint, and gorgeous chandlier.
Merker Interiors
No original source, I found it here.
I don't think I've ever seen a mattress on the floor look so lovely.
No original source, I found it here.
Not your typical 'shabby' but still so fun, comfy, and inviting.
Found at the same blog from above.
From the Velvet & Linen blog (!) here is a picture from Steve & Brooke Giannetti's home. To view their home tour click here. They've since made several changes to make things more gender neutral, but I really love how 'moderately' shabby their house is.
Shabby Chic
Lastly I want to end on a high note. Last year Rachel Ashwell, the woman behind Shabby Chic stores (and really the 'creator' of the style) had to file chapter 11 bankruptcy for her stores and product line. She wrote publicly about this on her blog. Happily her Simply Shabby Chic line did remain in Target stores. Now she has resructured her business and through alot of hard work and dedication has opened a new line of stores both here in the US and in London named, Shabby Chic Couture. For more information about her product lines, stores, or to read her blog click here.
March 2, 2010
Unfinished Finished Basement Before & After
Warning: ANOTHER LONG (and wordy) post to follow (sorry)
I've been wanting to do this post for a few weeks but haven't been able to churn it out due to all the craziness that's been going on. I mentioned in the blog post from yesterday that my husband and I decided to 'finish' our basement for the bridal shower I'd be throwing. By finish I really don't mean 'finish' in the traditional meaning of basement finishing. We wanted to give it a 'facelift' if you will.
Unfortunately I don't really have great 'before' pictures of the space. I found a few photos that were taken the day that we moved in that kind of show the basement, but they aren't great. I'm including them in here anyways. My house is considered a raised ranch, but it SO doesn't look like it. Basically our basement is under our house and houses our garage/work space on one side and our laundry room/basement on the other side. The basement side of the basement has a separate entrance and is where our laundry machines are located. there are two regular sized windows and three little basement windows. There is also a fireplace at one end. Here are the before pictures:
Awesome, right?
When deciding what to do for this space I knew that I wanted to be able to create different areas. First of all I really wanted to create as much of a separate laundry 'room' as possible. I had originally had the idea of hanging things from the ceiling to denote the space. However after talking with my husband and lots of other stuff we decided to make a room divider screen. We went to the rehabitat store near our house (if you live in KC and haven't been there you are missing out!) and found 4 sets of bifold closet doors. They were in pretty rough shape. They were stained brown and some of them had been partially painted white - a project that had been abandoned and left some of the doors partly white-ish while the rest of the doors remained brown. Hands down painting these bifold doors was the WORST project EVER. E-V-E-R. Also on the laundry side there was an existing bathroom vanity with sink (which was not being used, the water had been turned off to the faucet) and a countertop. The vanity separates the washer and the dryer and the countertop is on the opposite side of the dryer. And that is the laundry area.
Outside of the laundry area the basement had white-ish walls (very dingy), florescent work lights (3, ugh!), and cords sticking out of the ceiling and down the wall nearly everywhere you looked. The fireplace was red brick and dingy. The floors were grey. There are also 2 different ceiling heights and two built in closets.
Plan of attack:
• Separate the laundry area from the rest of the basement
• Paint the walls, trim, and the floor
• Paint the fireplace
• Hang up window treatments
• Figure out a way to hide all the wires.
• Swap out the lighting (NO fluorescents please!)
We started by painting the walls an aqua/teal color and the floors a dark chocolate brown. We painted one half of the basement, the side with the fireplace. Although we thought the floors and walls looked good, something was off. The red brick fireplace went from looking a little rough to looking flat out DINGY. It took me all of 3 seconds to decide that the fireplace had to be painted white. A few days later and a couple of coats on the fireplace and things immediately looked so much brighter and cleaner! We also were able to repurpose a shelf that had been hanging on the wall into a mantel for the fireplace. Hooray - brand new fireplace!
We finished painting the rest of the room with the aqua on the walls and the chocolate on the floor. We began painting the bifold doors a bright white and painted the trim a matching white. Chris (my hubby and in house worker man) took the sink off of the vanity and put a thick piece of ply wood on the top of the vanity so we could use it as a countertop in the laundry area. I've been using it to store our laundry baskets and once I hang a rod will use the adjoining countertop as a folding area. All of the built in closets and the ceilings were painted in the wall color to try and minimize all of the weird angles and heights in the room. Once all of the wall and floor painting was done we went back to the Rehabitat store and bought some of the (don't judge) industrial plastic floor trim in white. Although I am the first to admit that plastic floor trim isn't the height of sophistication I will also admit that occasionally my basement leaks. When that happens I don't want it to happen with wood floor trim, so I'll be a little ghetto with my plastic floor trim.
There is one more area that I want to highlight in the basement makeover before I get to the photos: lighting. As previously mentioned there were THREE florescent work lights in the basement. They are HIDEOUS. We talked about a couple of different options but in the end did something a little creative and went with lamp shades. Yes, we used plain lampshades with big light bulbs and made our own very inexpensive light fixtures. For under $10 each they are a perfect touch!
The only after photos I have right now are actually from the bridal shower, so here are a few more bridal shower pictures, but mostly look at the fabulous new basement! (hopefully soon I'll be able to show actual basement photos!) And now without further adu here is our new basement:
Views from the outside door looking in & the garage side looking in. You can see a couple of our lampshade lightfixtures as well as our total paint job.
I've been wanting to do this post for a few weeks but haven't been able to churn it out due to all the craziness that's been going on. I mentioned in the blog post from yesterday that my husband and I decided to 'finish' our basement for the bridal shower I'd be throwing. By finish I really don't mean 'finish' in the traditional meaning of basement finishing. We wanted to give it a 'facelift' if you will.
Unfortunately I don't really have great 'before' pictures of the space. I found a few photos that were taken the day that we moved in that kind of show the basement, but they aren't great. I'm including them in here anyways. My house is considered a raised ranch, but it SO doesn't look like it. Basically our basement is under our house and houses our garage/work space on one side and our laundry room/basement on the other side. The basement side of the basement has a separate entrance and is where our laundry machines are located. there are two regular sized windows and three little basement windows. There is also a fireplace at one end. Here are the before pictures:
Laundry side from the garage door
Fireplace side, also taken from the garage door. Built in closets are to the immediate left of this photo
Awesome, right?
When deciding what to do for this space I knew that I wanted to be able to create different areas. First of all I really wanted to create as much of a separate laundry 'room' as possible. I had originally had the idea of hanging things from the ceiling to denote the space. However after talking with my husband and lots of other stuff we decided to make a room divider screen. We went to the rehabitat store near our house (if you live in KC and haven't been there you are missing out!) and found 4 sets of bifold closet doors. They were in pretty rough shape. They were stained brown and some of them had been partially painted white - a project that had been abandoned and left some of the doors partly white-ish while the rest of the doors remained brown. Hands down painting these bifold doors was the WORST project EVER. E-V-E-R. Also on the laundry side there was an existing bathroom vanity with sink (which was not being used, the water had been turned off to the faucet) and a countertop. The vanity separates the washer and the dryer and the countertop is on the opposite side of the dryer. And that is the laundry area.
Outside of the laundry area the basement had white-ish walls (very dingy), florescent work lights (3, ugh!), and cords sticking out of the ceiling and down the wall nearly everywhere you looked. The fireplace was red brick and dingy. The floors were grey. There are also 2 different ceiling heights and two built in closets.
Plan of attack:
• Separate the laundry area from the rest of the basement
• Paint the walls, trim, and the floor
• Paint the fireplace
• Hang up window treatments
• Figure out a way to hide all the wires.
• Swap out the lighting (NO fluorescents please!)
We started by painting the walls an aqua/teal color and the floors a dark chocolate brown. We painted one half of the basement, the side with the fireplace. Although we thought the floors and walls looked good, something was off. The red brick fireplace went from looking a little rough to looking flat out DINGY. It took me all of 3 seconds to decide that the fireplace had to be painted white. A few days later and a couple of coats on the fireplace and things immediately looked so much brighter and cleaner! We also were able to repurpose a shelf that had been hanging on the wall into a mantel for the fireplace. Hooray - brand new fireplace!
We finished painting the rest of the room with the aqua on the walls and the chocolate on the floor. We began painting the bifold doors a bright white and painted the trim a matching white. Chris (my hubby and in house worker man) took the sink off of the vanity and put a thick piece of ply wood on the top of the vanity so we could use it as a countertop in the laundry area. I've been using it to store our laundry baskets and once I hang a rod will use the adjoining countertop as a folding area. All of the built in closets and the ceilings were painted in the wall color to try and minimize all of the weird angles and heights in the room. Once all of the wall and floor painting was done we went back to the Rehabitat store and bought some of the (don't judge) industrial plastic floor trim in white. Although I am the first to admit that plastic floor trim isn't the height of sophistication I will also admit that occasionally my basement leaks. When that happens I don't want it to happen with wood floor trim, so I'll be a little ghetto with my plastic floor trim.
There is one more area that I want to highlight in the basement makeover before I get to the photos: lighting. As previously mentioned there were THREE florescent work lights in the basement. They are HIDEOUS. We talked about a couple of different options but in the end did something a little creative and went with lamp shades. Yes, we used plain lampshades with big light bulbs and made our own very inexpensive light fixtures. For under $10 each they are a perfect touch!
The only after photos I have right now are actually from the bridal shower, so here are a few more bridal shower pictures, but mostly look at the fabulous new basement! (hopefully soon I'll be able to show actual basement photos!) And now without further adu here is our new basement:
Views from the outside door looking in & the garage side looking in. You can see a couple of our lampshade lightfixtures as well as our total paint job.
This photo is from the fireplace side looking towards the laundry side. I LOVE how you can't see the laundry machines!
Close up of the bifold door screens.
Photos of the fireplace, mantel, and cord hiding. At the top of the fireplace is a board that is running the length of the fireplace wall about 6 inches or so down. It is painted the same color as the walls but serves as a hiding place for all the hideous wires that are hanging from the ceiling that we couldn't remove or box in. The paper banners are actually hanging from this 'ledge'.
Close up of the fireplace and repurposed mantel.
Far away shot of the fireplace side.
I hope you enjoyed your pseudo-tour of my unfinished finished basement. My apologies for the party pics, I will try and get actual basement photos soon. Additionally I now hate blogger and their weird formatting because I can't get my photos or text aligned the way it needs to, so please ignore the weird formatting.
August 21, 2009
Barn Cabin Fever
For the past several months I've been dreaming of converting an old barn into a weekend cabin getaway (not that I have the money to do this, or an old barn to convert, but I suppose that is why it is called a dream). So for the past several months I've toyed with this in my mind. About 2 months ago I mentioned it to the hubby. A few weeks ago I started collecting photos....and whining to the hubster..... :)
I should really stop torturing myself.
Alas, here is are some photos that I think would be wound into my cabin getaway.
A Michigan Heritage Barn - it looks like half a house & half a barn.
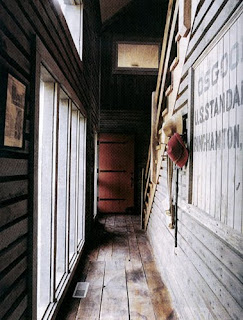
I LOVE this door! Wouldn't it be a perfect entry?
This is my favorite bathroom. I think it would work in my barn cabin. This is from the Bracken Cottage in West Brooksville, Maine.
This is the New River Bank Barn converted by Blackburn Architects.
Barn Conversion by Shed Architects in Seattle.
The Granery by Blackburn Architects.
Another view of the Barn Conversion by Shed Architects.June 23, 2009
Temporary Decor Ideas for Military Housing
{WARNING: LONG POST TO FOLLOW}
This past weekend I was able to visit a military base for the first time as my sister and brother-in-law, who is in the Air Force, moved onto base housing. I had never been on a base before and really found the whole thing to be very pleasant and quaint. My sisters new home is actually much nicer than I would have imagined as I feel I've always heard adverse things about military housing. The home seemed extremely well kept & up to date. Nothing fancy, but not bad at all.
As the man & I were driving back home I began to brainstorm about how you would decorate a home that didn't belong to you and that had to be kept in essentially the same condition as when you moved in, much like an apartment. My sister says that the official rule is, 'white walls in, white walls out', meaning you can paint, but you do so with the understanding that you will be required to repaint back to white before you move. With this idea in mind I've compiled a list of easy, stylish, & temporary decor ideas for base housing (which also apply to apartment dwellers as well).
In the past several years there has been a major increase in the popularity of vinyl wall decals. To be honest, I'm generally not a huge fan, however, wall decals have really taken on a life of their own and they no longer are just names & phrases. Wall decals come in nearly every shape, size, color, or design imaginable - and the best part is that they are very inexpensive temporary decor. There are tons of companies that offer standard or custom designs, they are even available on Etsy. Here are some that caught my eye:
From Dali Decals:
From Etsy seller byrdigraphic:
Wall decals are a great way to decorate a childs room, this is from Etsy seller studiojk:
Another great alternative with a big impact is temporary wallpaper or wallcoverings. Many of us have had the unfortunate experience of taking down preexisting wallpaper, but with the invention of temporary wallpaper this experience is a thing of the past. There are a few companys that carry this product, namely Sherwin Williams (Easy Change Wallpaper), Paper Apartment, and TemPaper. I wasn't able to find out much about the Sherwin Williams product, but it didn't seem super user friendly. Paper Apartment papers come in a blank paper role (choice of color) and a paint pen for making your own designs. It is attached to the wall with 3M stick tabs (the tabs sounded to me like they were essentially large scrapbook tabs). It seemed as if Paper Apartment papers weren't as user friendly and truthfully were difficult to install and time consuming to decorate. Overall it seems as if TemPaper is the favorite, and with a little research it isn't hard to see why - it is stinkin' easy to put up and take down. There are 5 VERY basic rules of application that I would liken to peeling the back off of a label and sticking it on the wall. It supposedly (from the website & individual reviews) removes as easy as a post-it. Here are some of their designs:


Another great way to cover your walls temporarily is an old method of using fabric and good old liquid starch. This is a pretty simple project and as long as you choose an inexpensive fabric it can also be done for a reasonable amount. For full directions on how to 'fabric' your walls click here.
Photo via Jesseblog:
I hope that these tips find all military and apartment dewellers doing well and feeling inspired!
This past weekend I was able to visit a military base for the first time as my sister and brother-in-law, who is in the Air Force, moved onto base housing. I had never been on a base before and really found the whole thing to be very pleasant and quaint. My sisters new home is actually much nicer than I would have imagined as I feel I've always heard adverse things about military housing. The home seemed extremely well kept & up to date. Nothing fancy, but not bad at all.
As the man & I were driving back home I began to brainstorm about how you would decorate a home that didn't belong to you and that had to be kept in essentially the same condition as when you moved in, much like an apartment. My sister says that the official rule is, 'white walls in, white walls out', meaning you can paint, but you do so with the understanding that you will be required to repaint back to white before you move. With this idea in mind I've compiled a list of easy, stylish, & temporary decor ideas for base housing (which also apply to apartment dwellers as well).
In the past several years there has been a major increase in the popularity of vinyl wall decals. To be honest, I'm generally not a huge fan, however, wall decals have really taken on a life of their own and they no longer are just names & phrases. Wall decals come in nearly every shape, size, color, or design imaginable - and the best part is that they are very inexpensive temporary decor. There are tons of companies that offer standard or custom designs, they are even available on Etsy. Here are some that caught my eye:
From Dali Decals:
Another great way to cover your walls temporarily is an old method of using fabric and good old liquid starch. This is a pretty simple project and as long as you choose an inexpensive fabric it can also be done for a reasonable amount. For full directions on how to 'fabric' your walls click here.
Photo via Jesseblog:
May 8, 2009
2 things
Lately I've been dreaming of 2 things:
Here is my new dream bathroom - this is the guest house bathroom. Absolutely adorable.


- Taking a relaxing vacation to Maine
- Building a small weekend home
Unfortuantly, neither one of these is really a reality....I can still dream though. As I was looking at vacation rental cottages (I love to do this) I came across the Bracken Cottage, located in West Brooksville, ME. This particualar cottage captured my heart because:
- It is an adorable vacation cottage in Maine
- It has a small adorable guest house.
Here are the pictures to prove that I'm not crazy and that you should dream of your own Maine vacation in a cottage :)
If you want to check out the Bracken Cottage for yourself: http://www.mainevacationrentalsonline.com/seaside/Bracken%20Cottage/BCDetails.htm
Subscribe to:
Posts (Atom)